Showing posts with label tutorial. Show all posts

Friday, June 4, 2010

On The Edge with Cassie

Cassie from You Go Girl has supplied a great tutorial called On The Edge. She takes us through step-by-step how to make these pillowcases with a beautiful crocheted edge.


Step 1: Getting the Goods -gathering supplies

Step 2: Stitching up a Storm -- sewing the pillowcases

Step 3: Firm Foundation -- prepare edges for crocheting

Week 4: On the Edge--crocheting the scallop pattern

Are you ready to crochet along with Cassie and her On The Edge tutorial?

Thursday, June 3, 2010

Recycled - Upcycled Sweaters

Okay, I know this whole thing about upcycling sweaters and using the yarn for another project has been around for a while, but I just came across it last night. It is brilliant! Yarn is so expense especially good quality yarn.

I found a couple of tutorials that explain the whole process better. Craftstylish and Craftzine

Holy cows, are you as excited I am!? I will never look at a thrift store the same again. Think about all the over/undersized sweaters that won't come close to fitting you but the yarn is fabulous. Think about all the ugly sweaters that are made out of wool or cashmere. How about your own closet? Or does your someone in your family have a sweater that is ugly or doesn't fit anyone? And think about garage sales too!

I can't wait until Monday when the Salvation Army here in town has all their clothes 50% off! Yikes! I might be going a little crazy!

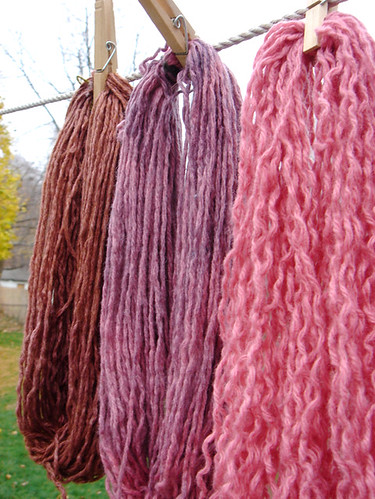
Upcycled yarn from a thrifted sweater

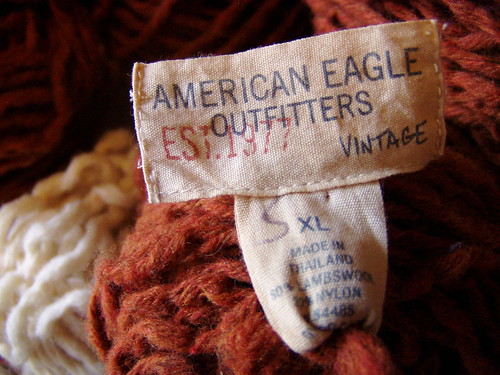
Recycled yarn from a sweater bought on Etsy


Remains from a recycled sweater

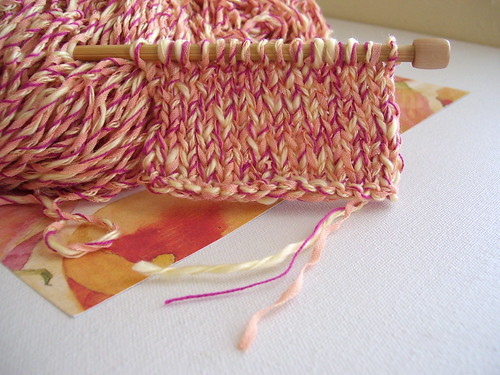
Peach Berry Twist Recycled Handspun Yarn from a Sweater
Have you guys tried this yet? If not, have I inspired you to start?

Saturday, April 24, 2010

Photo Organization and mini DIY

Today I wanted to share with you how I organize my photos that I need to scrapbook.
I found an ugly recipe box for a couple of dollars (it had chickens on it). I wasn't too worried about what the box looked like because I wanted to add my own spin on it. Once I got home, I selected two different scrapbooking papers and picked one for the box and one for the lid. The papers I used are from the brand Kaleidoscope. Then, I used mod podge to glue and seal the papers to the box. Once it was dry, I selected a chipboard frame from SEI and just glued the very outside edges to the top of the lid while leaving one edge unglued so I could slip a photo inside of it.
Now, I have a few different steps for my organizational madness. First, I organize my pictures from an event like Salt Lake City or Snowman. After those pictures are scrapbooked and if I have extra pictures of people then those pictures get put into another category like aunts, me, Laura (my sister), etc. Once my pictures are sorted. I added a little tab to the top of a recipe card. For my tab, I just wrote my title on sturdy white paper, cut it out making sure I left the bottom a little longer so that I could tape it to the recipe card.
Done! How do you organize your photos? I have been wanting to put all the extras into a photo album and add quotes to each page or picture but that will be 'someday.'

Wednesday, March 17, 2010

Fabric - Bead Bracelet Tutorial

Hello! I have been wanting to do a tutorial for a long time but I didn't know what to do. Then, it just came to me. You know those moments when the light bulb goes on, you then get a huge smile on your face, and get all giddy. That is what happened to me last night.

My vision turned out . . . and I will share with you all the steps to make your own bracelet.

List:

1. Wooden beads
2. Sand paper
3. Extra beads of your choice
4. Fabric
5. Scissors
6. Fabric tack
7. Stretchy cord
8. Glimmer ( I don't know the proper name but see image further below)
9. Paint
10. 2-3 paint brushes


The finished look. . . okay let's begin

Find some wooden beads of your choice. I like the large ones for a bolder statement.
Start sanding. You want to sand off all the shine/coat to make sure the paint will stick.

Next, paint your beads with one coat. Another coat will come later.

Get out your glimmer. Sorry, I don't know the correct name for this stuff.
When the first coat of paint is dry, apply another coat to your beads. However, this time don't paint them all at once. Do a few and then brush on some glimmer while the beads are still tacky from the paint.
You might need two paint brushes for this task (applying on the glimmer) and don't use the brush that you are using for the painting) because the brush will probably get damp from the paint and a dry brush works better.

Here is the finished look of the beads. They are shiny and pretty!
Oh, don't worry about getting an even coat of glimmer. It adds more character when everything is not perfect.

Use your scissors to cut triangles from a piece of fabric. Use your creativity.
You can choose all different colors, widths, lengths, etc.
Mine were .5 inches - 1.5 inches in width
and about 8 inches in length.
Again don't worry about perfection. Be random.

I used a paint brush as a dowel but I wish I could have found something a little smaller but I am happy. (Some of the ends of the fabric bead got a little large.)
Next, apply a tad of fabric tack to the right side of the widest part of your fabric and down both sides of the wrong side of the fabric to the end of the triangle.
Now, roll it up. I like holding it like this because you can twist the dowel and guide the fabric with your thumb. You will get sticky.

Here is one done.

I did five. All a little different.
Trim up the edges and stray threads if you chose.

As the beads are drying get out your stretchy cord.

Now start playing! Arrange and rearrange until you are happy.

Make sure it fits your wrist. Not too big. Not too small.
I had extra wooden beads and fabric beads left over.
I will use them for another bracelet later.
Then, make a surgeon's knot to secure the ends.
Source: Bead Style

Place a tad of fabric tack on the knot.
Trim the extra cord and tuck in the knot into a bead.

DONE!

Have fun!

AND ENJOY YOUR NEW BRACELET!
Once you make one, you can't help but to think of all the new color combinations, bead options, etc.
Please be sure to share with me your new creations.